created : 2021-09-17, updated : 2021-09-17
Introduction
이전 튜토리얼에서 Service를 등록하고 간단하게 호출하는 부분을 진행했다. 이제는 Microservice 환경에서 각각의 서비스간 호출을 위해 사용하는 Load Balancing을 알아보겠다.
Requirements
Service Registration and Discovery 튜토리얼을 먼저 학습한다.
Note. 이 튜토리얼의 소스는 이곳에서 확인할 수 있다. initial은 이전 튜토리얼에서의 구성한 소스이고 complate는 본 튜토리얼에 추가한 부분이 포함되어 있다.
구성
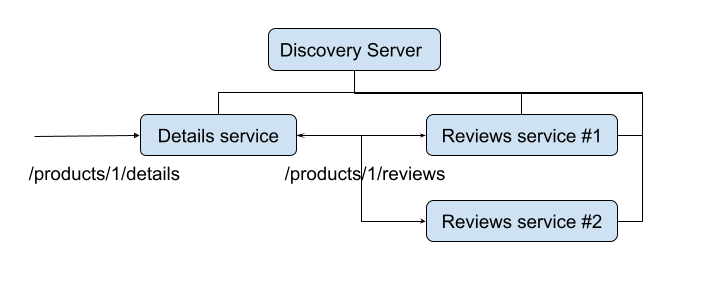
Review 서비스를 2개 구동을 하고 details에서 review 정보를 가져올때 기존의 OpenFeign 을 이용한 것과 RestTemplate을 이용해서 가져오는 것을 설명할 거다. Review 서비스를 한 서버/랩탑에서 동시에 2개를 구동하기 위해서는 포트를 다르게 구동합니다. java -jar 명령에 Parameter를 추가하여 구동을 한다.

OpenFeign 으로 Load Balancer 확인하기
이전 튜토리얼에서는 OpenFeign 을 사용하였는데 이 기술을 사용하면 Ribbon(Load Balancer)을 자동으로 사용하고 있다. 그래서 구성도 처럼 reviews를 2개 구동하여 Client Side의 Load Balancer가 동작하는 것을 확인해보겠다. 이번에는 server port도 동적으로 변경하기 위해 모두 (discovery, details, reviews)을 jar로 패키징을 하고 jar로 실행을 하겠다.
패키지를 만들기 - (discovery, details, reviews 모두 동일함)
1
2
$ mvn clean package
…
명령문을 수행하면 jar 파일을 만든것을 아래의 명령문으로 확인할 수 있다. (discovery를 예로 설명)
1
2
3
4
5
6
7
8
9
10
11
12
13
$ ls -al target
total 92488
drwxr-xr-x  11 ahnchan  staff       352 Sep 15 13:42 .
drwxr-xr-x@ 14 ahnchan  staff       448 Sep 13 12:05 ..
drwxr-xr-x   4 ahnchan  staff       128 Sep 13 12:05 classes
-rw-r--r--   1 ahnchan  staff  47347368 Sep  8 10:18 discovery-0.0.1-SNAPSHOT.jar
-rw-r--r--   1 ahnchan  staff      3163 Sep  8 10:18 discovery-0.0.1-SNAPSHOT.jar.original
drwxr-xr-x   3 ahnchan  staff        96 Sep  8 10:18 generated-sources
drwxr-xr-x   3 ahnchan  staff        96 Sep  8 10:18 generated-test-sources
drwxr-xr-x   3 ahnchan  staff        96 Sep  8 10:18 maven-archiver
drwxr-xr-x   3 ahnchan  staff        96 Sep  8 10:18 maven-status
drwxr-xr-x   4 ahnchan  staff       128 Sep  8 10:18 surefire-reports
drwxr-xr-x   3 ahnchan  staff        96 Sep 13 12:05 test-classes
discovery-0.0.1-SNAPSHOT.jar가 패키징 된것을 확인할 수 있다. 이제 각각의 서비스에서 java -jar 명령문을 이용해서 구동을 하겠다.
Discovery 실행하기
1
2
3
4
5
6
7
8
9
10
11
12
13
14
15
$ java -jar target/discovery-0.0.1-SNAPSHOT.jar

  .   ____          _            __ _ _
 /\\ / ___'_ __ _ _(_)_ __  __ _ \ \ \ \
( ( )\___ | '_ | '_| | '_ \/ _` | \ \ \ \
 \\/  ___)| |_)| | | | | || (_| |  ) ) ) )
  '  |____| .__|_| |_|_| |_\__, | / / / /
 =========|_|==============|___/=/_/_/_/
 :: Spring Boot ::                (v2.5.4)

2021-09-15 15:28:06.279  INFO 22448 --- [           main] c.a.b.discovery.DiscoveryApplication     : Starting DiscoveryApplication v0.0.1-SNAPSHOT using Java 11.0.11 on 36-221-190-190.cab.prima.net.ar with PID 22448 (/Users/ahnchan/Workspaces/Projects/Tutorial/tutorial-spring-service-registration-and-discovery/bookstore/complete/discovery/target/discovery-0.0.1-SNAPSHOT.jar started by ahnchan in /Users/ahnchan/Workspaces/Projects/Tutorial/tutorial-spring-service-registration-and-discovery/bookstore/complete/discovery)
2021-09-15 15:28:06.283  INFO 22448 --- [           main] c.a.b.discovery.DiscoveryApplication     : No active profile set, falling back to default profiles: default
2021-09-15 15:28:07.888  INFO 22448 --- [           main] o.s.cloud.context.scope.GenericScope     : BeanFactory id=b429867f-893f-3880-a8fd-fde460bda783
2021-09-15 15:28:08.320  INFO 22448 --- [           main] o.s.b.w.embedded.tomcat.TomcatWebServer  : Tomcat initialized with port(s): 8761 (htt
…
Details 실행하기
1
2
3
4
5
6
7
8
9
10
11
12
13
14
15
16
17
$ java -jar target/details-0.0.1-SNAPSHOT.jar

  .   ____          _            __ _ _
 /\\ / ___'_ __ _ _(_)_ __  __ _ \ \ \ \
( ( )\___ | '_ | '_| | '_ \/ _` | \ \ \ \
 \\/  ___)| |_)| | | | | || (_| |  ) ) ) )
  '  |____| .__|_| |_|_| |_\__, | / / / /
 =========|_|==============|___/=/_/_/_/
 :: Spring Boot ::                (v2.5.4)

2021-09-15 15:29:54.281  INFO 22560 --- [           main] c.a.b.details.DetailsApplication         : Starting DetailsApplication v0.0.1-SNAPSHOT using Java 11.0.11 on 36-221-190-190.cab.prima.net.ar with PID 22560 (/Users/ahnchan/Workspaces/Projects/Tutorial/tutorial-spring-service-registration-and-discovery/bookstore/complete/details/target/details-0.0.1-SNAPSHOT.jar started by ahnchan in /Users/ahnchan/Workspaces/Projects/Tutorial/tutorial-spring-service-registration-and-discovery/bookstore/complete/details)
2021-09-15 15:29:54.285  INFO 22560 --- [           main] c.a.b.details.DetailsApplication         : No active profile set, falling back to default profiles: default
2021-09-15 15:29:55.526  INFO 22560 --- [           main] .s.d.r.c.RepositoryConfigurationDelegate : Bootstrapping Spring Data JPA repositories in DEFAULT mode.
2021-09-15 15:29:55.809  INFO 22560 --- [           main] .s.d.r.c.RepositoryConfigurationDelegate : Finished Spring Data repository scanning in 267 ms. Found 1 JPA repository interfaces.
2021-09-15 15:29:56.157  INFO 22560 --- [           main] o.s.cloud.context.scope.GenericScope     : BeanFactory id=fd885a71-07b6-3efc-a47c-dca5b79e1c85
2021-09-15 15:29:56.734  INFO 22560 --- [           main] o.s.b.w.embedded.tomcat.TomcatWebServer  : Tomcat initialized with port(s): 8080 (http)
…
Reviews에 디버깅 코드 추가 및 2개의 Application 을 실행하기
2개의 Application을 구동할 것이기에 구분을 하기 위해서 화면에 정보를 뿌려주는 코드를 추가해보겠다. 화면에 요청된 Product의 Id 출력해주는 부분을 추가하였다.
파일 : ReviewsApplication.java
1
2
3
4
5
6
7
8
9
…
   @GetMapping("/products/{id}/reviews")
   public List<Review> getReviewsByProductId(@PathVariable Integer id) {

       System.out.println("Product Id : "+ id);

       return repository.retrivefindById_product(id);
   }
…
변경된 내용을 적용하기 위해 패키지하고 실행을 한다. 첫번째 Application을 실행한다.
1
2
$ mvn clean package
…
1
2
3
4
5
6
7
8
9
10
11
12
13
14
15
16
17
$ java -jar target/reviews-0.0.1-SNAPSHOT.jar

  .   ____          _            __ _ _
 /\\ / ___'_ __ _ _(_)_ __  __ _ \ \ \ \
( ( )\___ | '_ | '_| | '_ \/ _` | \ \ \ \
 \\/  ___)| |_)| | | | | || (_| |  ) ) ) )
  '  |____| .__|_| |_|_| |_\__, | / / / /
 =========|_|==============|___/=/_/_/_/
 :: Spring Boot ::                (v2.5.4)

2021-09-15 15:31:05.975  INFO 22579 --- [           main] c.a.b.reviews.ReviewsApplication         : Starting ReviewsApplication v0.0.1-SNAPSHOT using Java 11.0.11 on 36-221-190-190.cab.prima.net.ar with PID 22579 (/Users/ahnchan/Workspaces/Projects/Tutorial/tutorial-spring-service-registration-and-discovery/bookstore/complete/reviews/target/reviews-0.0.1-SNAPSHOT.jar started by ahnchan in /Users/ahnchan/Workspaces/Projects/Tutorial/tutorial-spring-service-registration-and-discovery/bookstore/complete/reviews)
2021-09-15 15:31:05.977  INFO 22579 --- [           main] c.a.b.reviews.ReviewsApplication         : No active profile set, falling back to default profiles: default
2021-09-15 15:31:07.226  INFO 22579 --- [           main] .s.d.r.c.RepositoryConfigurationDelegate : Bootstrapping Spring Data JPA repositories in DEFAULT mode.
2021-09-15 15:31:07.509  INFO 22579 --- [           main] .s.d.r.c.RepositoryConfigurationDelegate : Finished Spring Data repository scanning in 267 ms. Found 1 JPA repository interfaces.
2021-09-15 15:31:07.865  INFO 22579 --- [           main] o.s.cloud.context.scope.GenericScope     : BeanFactory id=f2b73979-807b-3a06-b09f-29a426ba36b7
2021-09-15 15:31:08.418  INFO 22579 --- [           main] o.s.b.w.embedded.tomcat.TomcatWebServer  : Tomcat initialized with port(s): 8081 (http)
…
Properties 파일에 선언된 8081로 Application 을 시작하였다. 두번째 Application은 포트를 8082로 바꾸어서 시작을 해보겠다.
Note. Parameter를 넣지 않으면 8081포트를 기존에 사용하고 있다는 오류 메세지가 나온다. 포트는 하나의 프로세스가 사용하면 다른 프로세스에서는 사용할 수가 없으니 이런 오류가 발생한다.
1
2
3
4
5
6
7
8
9
10
11
12
13
14
15
16
17
$ java -jar target/reviews-0.0.1-SNAPSHOT.jar --server.port=8082

  .   ____          _            __ _ _
 /\\ / ___'_ __ _ _(_)_ __  __ _ \ \ \ \
( ( )\___ | '_ | '_| | '_ \/ _` | \ \ \ \
 \\/  ___)| |_)| | | | | || (_| |  ) ) ) )
  '  |____| .__|_| |_|_| |_\__, | / / / /
 =========|_|==============|___/=/_/_/_/
 :: Spring Boot ::                (v2.5.4)

2021-09-15 15:37:00.312  INFO 22670 --- [           main] c.a.b.reviews.ReviewsApplication         : Starting ReviewsApplication v0.0.1-SNAPSHOT using Java 11.0.11 on 36-221-190-190.cab.prima.net.ar with PID 22670 (/Users/ahnchan/Workspaces/Projects/Tutorial/tutorial-spring-service-registration-and-discovery/bookstore/complete/reviews/target/reviews-0.0.1-SNAPSHOT.jar started by ahnchan in /Users/ahnchan/Workspaces/Projects/Tutorial/tutorial-spring-service-registration-and-discovery/bookstore/complete/reviews)
2021-09-15 15:37:00.315  INFO 22670 --- [           main] c.a.b.reviews.ReviewsApplication         : No active profile set, falling back to default profiles: default
2021-09-15 15:37:01.392  INFO 22670 --- [           main] .s.d.r.c.RepositoryConfigurationDelegate : Bootstrapping Spring Data JPA repositories in DEFAULT mode.
2021-09-15 15:37:01.688  INFO 22670 --- [           main] .s.d.r.c.RepositoryConfigurationDelegate : Finished Spring Data repository scanning in 282 ms. Found 1 JPA repository interfaces.
2021-09-15 15:37:02.031  INFO 22670 --- [           main] o.s.cloud.context.scope.GenericScope     : BeanFactory id=f2b73979-807b-3a06-b09f-29a426ba36b7
2021-09-15 15:37:02.590  INFO 22670 --- [           main] o.s.b.w.embedded.tomcat.TomcatWebServer  : Tomcat initialized with port(s): 8082 (http)
…
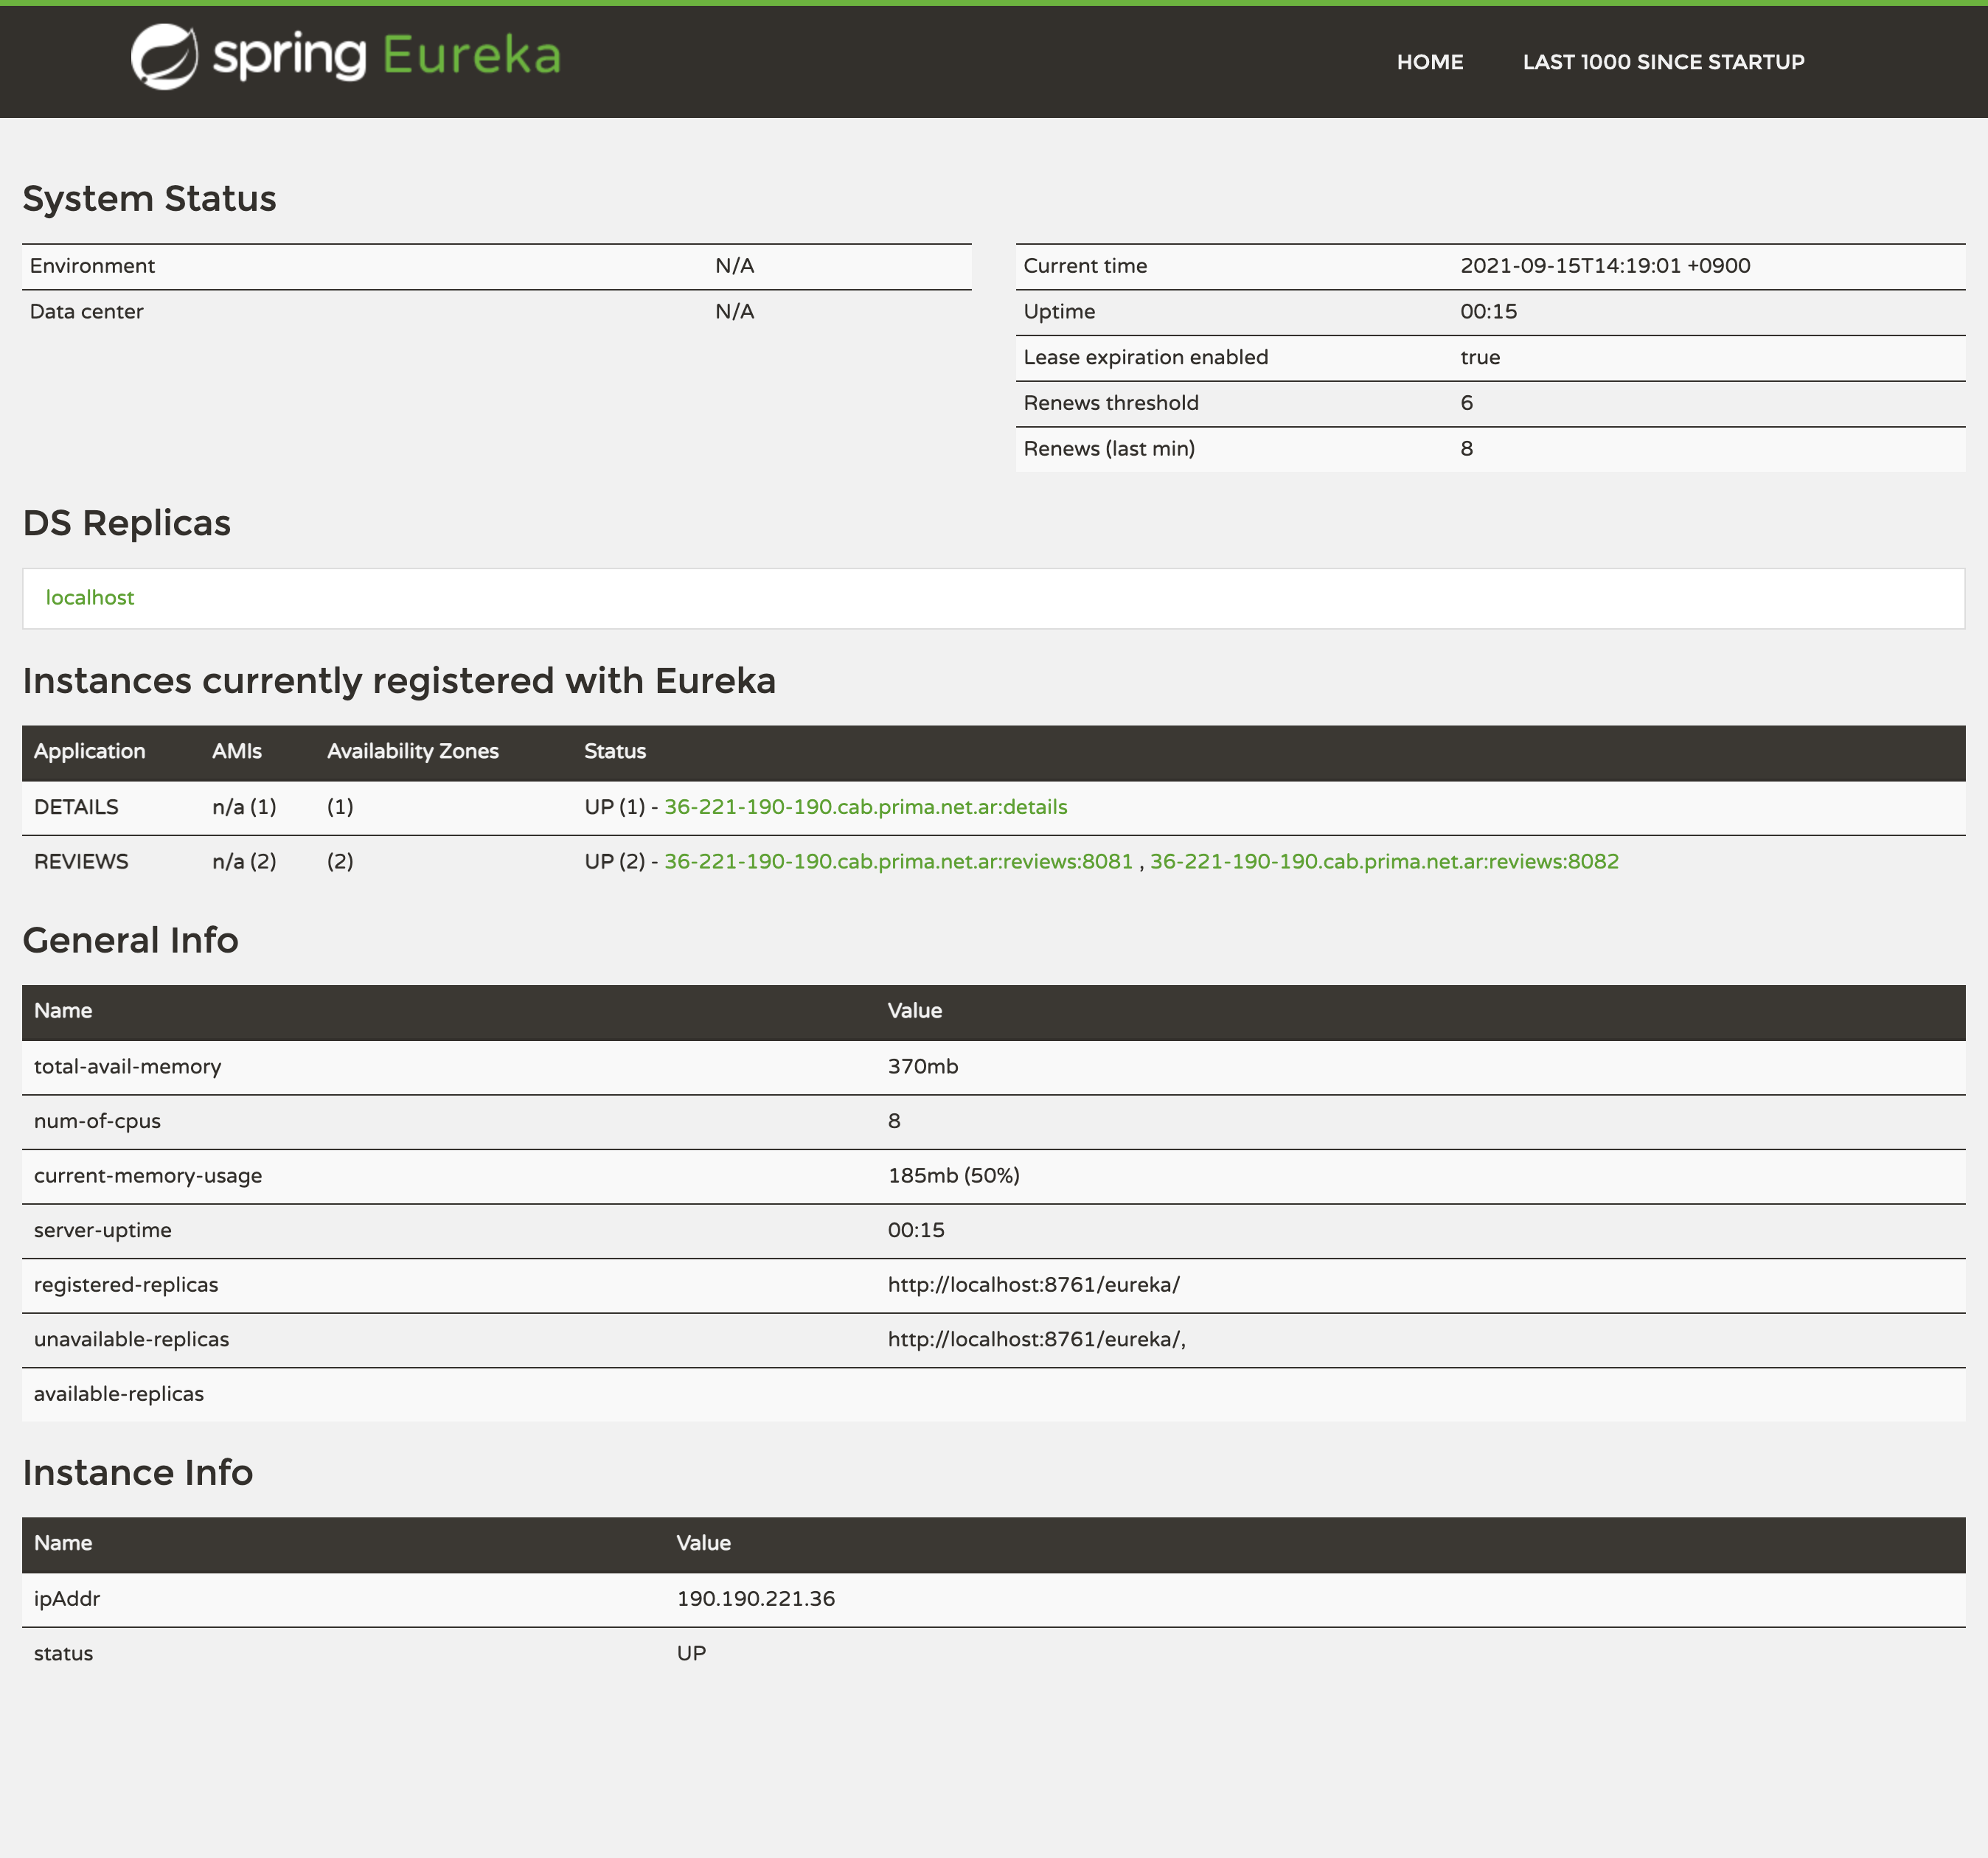
8082포트로 구동된 것을 확인할 수 있을 것이다. Eureka Server(Discovery 서버의 8761 포트)에 브라우저로 접속하여 Reviews가 2개 접속되어 있는 것을 확인할 수 있다. (https://localhost:8761)

이제 detail에 API를 호출해서 review의 서비스 요청을 2개의 Application에서 번갈아가면서 처리하는 것을 확인해보자.
1
2
3
4
5
6
7
8
9
10
11
12
13
14
15
16
17
18
19
20
21
22
23
24
25
26
27
28
29
30
$ curl localhost:8080/products/1/detailsV2 | jq

{
  "product": {
    "id": 1,
    "title": "The Keeper of Happy Endings",
    "author": "Barbara Davis",
    "isbn": "1542021472"
  },
  "reviews": [
    {
      "id": 1,
      "id_product": 1,
      "reviewer": "linda galella",
      "text": "we just don't like each other very much.\\”"
    },
    {
      "id": 2,
      "id_product": 1,
      "reviewer": "Klapaucjusz",
      "text": "It is one more book about WW II where action takes place in different time frames."
    },
    {
      "id": 5,
      "id_product": 1,
      "reviewer": "DisneyDenizen",
      "text": "ON THE PLUS SIDE: Written by an established author."
    }
  ]
}
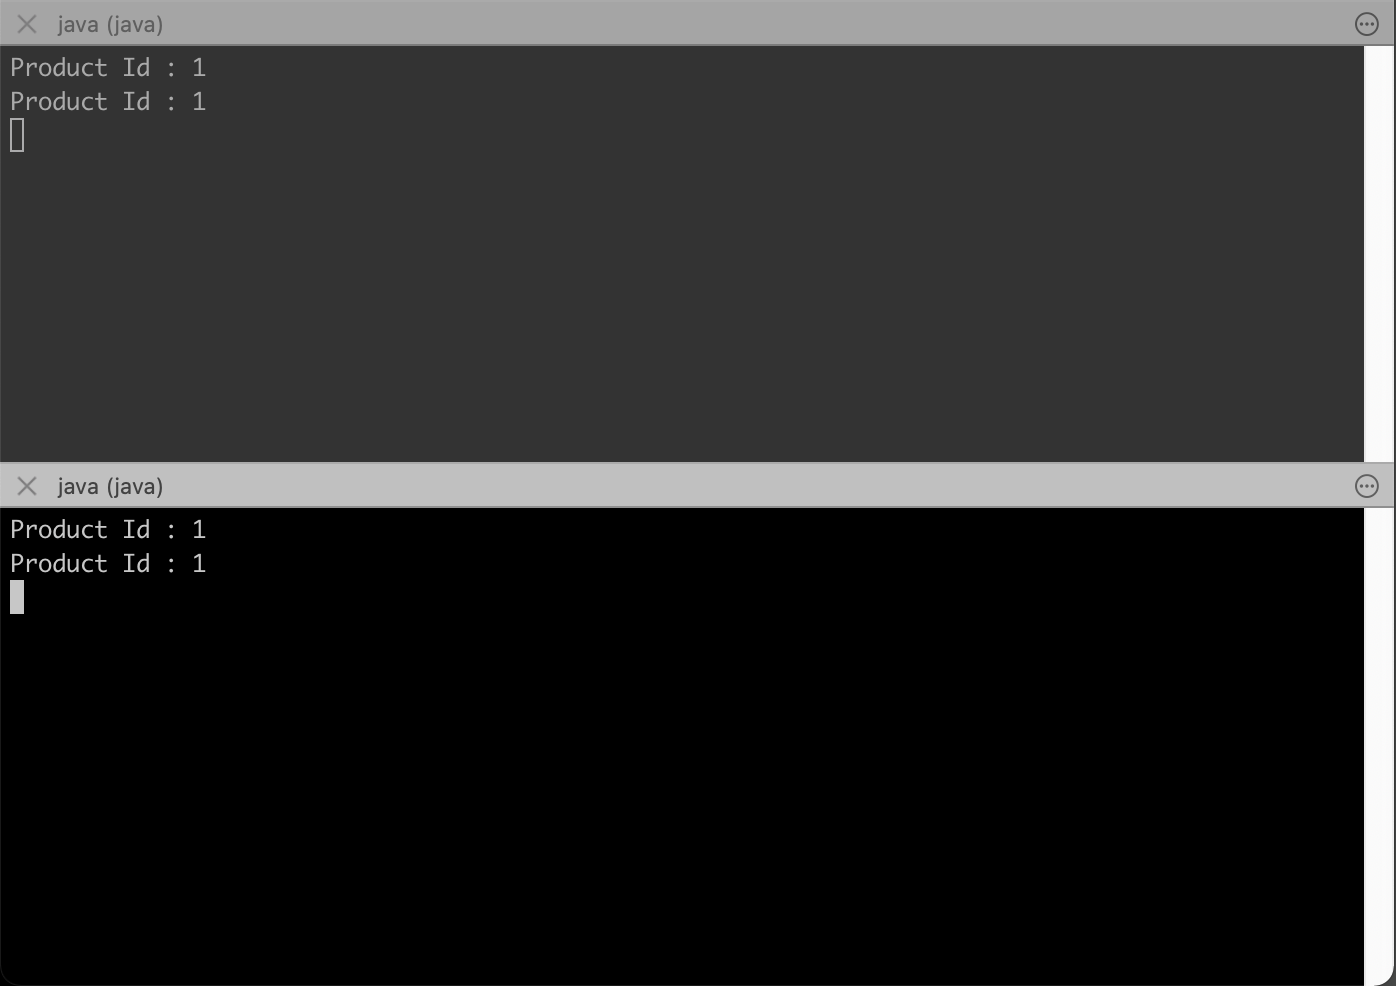
Detail Service에 Id는 1인 Product의 모든 정보를 요청하였다. 결과는 위와 같이 리뷰정보까지 가져온다. 이렇게 4번 정도 수행하면 아래와 같이 2개의 Application 에서 찍히는 것을 확인할 수 있다. 위는 8081로 구동한 Reviews Application이고 아래는 8082로 구동한 Reviews Application이다.

RestTemplate을 이용여 LoadBalance 처리하기 (Ribbon)
RestTemplate을 이용하여 Service를 호출해 보겠다. 먼저 Ribbon을 Dependencies에 추가를 해야한다. 현재 튜토리얼에서는 OpenFeign 을 사용하면 Ribbon이 포함되기 때문에 따로 추가를 하지 않아도 되지만, OpenFeign을 사용하지 않으면 라이브러리를 추가해야한다.
RestTemplate을 설정을 해보자. Configuration을 RestTemplate을 설정하고, @LoadBalanced를 추가한다. 이 Annotation 으로 간단하게 Client 에서의 Load Balance를 구성할 수 있다.
파일: DetailsApplication.java
1
2
3
4
5
6
7
8
9
@Configuration
class MyConfiguration {

  @LoadBalanced
  @Bean
  RestTemplate restTemplate() {
     return new RestTemplate();
  }
}
Details에 서비스를 API를 추가해보자.
파일 : DetailsApplication.java
1
2
3
4
5
6
7
8
9
10
@GetMapping("/products/{id}/detailsV1")
public ProductDetail getProductDetails(@PathVariable Integer id) {

  Optional<Product> product = repository.findById(id);
  ProductDetail details = new ProductDetail();
  details.setProduct(repository.findById(id).get());
  details.setReviews(restTemplate.getForObject("http://reviews/products/"+id+"/reviews", List.class));

  return details;
}
Details Application을 실행해보자. 기존에 동작하고 있으면 먼저 종료를 한다.
1
2
$ mvn spring-boot:run
…
이제 실행해서 API를 호출해보자. detailsV1을 호출한다.
1
2
3
4
5
6
7
8
9
10
11
12
13
14
15
16
17
18
19
20
21
22
23
24
25
26
27
28
29
30
$ curl localhost:8080/products/1/detailsV1 | jq

{
  "product": {
    "id": 1,
    "title": "The Keeper of Happy Endings",
    "author": "Barbara Davis",
    "isbn": "1542021472"
  },
  "reviews": [
    {
      "id": 1,
      "id_product": 1,
      "reviewer": "linda galella",
      "text": "we just don't like each other very much.\\”"
    },
    {
      "id": 2,
      "id_product": 1,
      "reviewer": "Klapaucjusz",
      "text": "It is one more book about WW II where action takes place in different time frames."
    },
    {
      "id": 5,
      "id_product": 1,
      "reviewer": "DisneyDenizen",
      "text": "ON THE PLUS SIDE: Written by an established author."
    }
  ]
}
4번을 수행해보면 각각의 Reviews Service에 디버깅 코드가 번갈아가면서 나오는 것을 확인 할 수 있다.

Conclusions
Ribbon을 사용하여 Client 에서의 Load Balancer를 추가하는 방법을 확인해보았다. Client Side Load Balancer는 Microservice에서 서비스간의 통신을 간단하게 할수 있는 방법을 제시하고 있다.
References
(Client Side Load Balancer: Ribbon)[https://cloud.spring.io/spring-cloud-static/Dalston.SR5/multi/multi_spring-cloud-ribbon.html]
(Spring RestTemplate as a Load Balancer Client)[https://cloud.spring.io/spring-cloud-static/Dalston.SR5/multi/multi__spring_cloud_commons_common_abstractions.html#_spring_resttemplate_as_a_load_balancer_client]