created : 2021-09-09, updated : 2021-09-09
Introduction
Spring Framework 환경에서 서비스를 등록/관리하고 이 서비스를 다른 서비스에서 사용하는 방법을 설명해보겠다. 이 문서는 https://spring.io/guides/gs/service-registration-and-discovery/를 기본으로 하단의 다른 문서들을 참조해가면서 작성이 되었으며, 실제로 서비스를 이용하고 통신하는 부분을 추가하였다.
Note. 튜토리얼을 따라서 하기 편하게 하기 위해서 main 이 있는 class(Application) 에 모든 class 를 넣었다. 실제로 프로젝트를 할때에는 각각의 Class들을 파일/디렉토리에 분리하여 작성해야한다. 물론 Controller 내에 실제 서비스 영역도 분리해서 작성하는 것이 일반적이다.
Note. 본 튜토리얼의 소스는 Github 저장소 에 있으며, initial 은 소스코드를 추가하지 않은 기본적인 상태이고, complate 디렉토리가 본튜토리얼을 완료했을 때의 소스이다.
Let’s Start
튜토리얼을 시작하기 위해 필요한 구성을 설명해보겠다. 총 3가지의 프로젝트를 만들고 실행할 것이다. 가상으로 Bookstore 서비스로 책에 대한 정보를 확인하고 해당 책에 대한 Review를 확인하는 REST API 서비스를 구성할 것이다.
Note. 웹 화면은 없이 API 로만 통신하는 부분으로 만들 것이다.
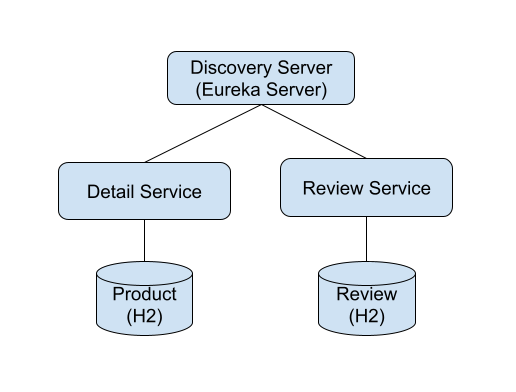
전체 구성을 간단하게 Diagram으로 도식화하면 아래와 같다. 
- Discovery Server : Spring Cloud Netflix Eureka Server 를 구동한다. 서비스들의 정보를 확인할 수 있다.
- Detail Service : 책(product)의 정보를 제공하는 API 서비스이다.
- Review Service : 책에 리뷰 정보를 제공하는 API 서비스이다.
DB는 간단한 H2 Database를 사용하였다.
Spring Initializr 에서 프로젝 이름과, 라이브러리를 선택하여 각각의 서비스/서버를 만들어보자. Java 11 을 선택하고 Spring Boot 최신버전, Maven 를 선택하였다. 패키지명이나 이름은 아래와 같이 설정하였다.
Discovery
Group : com.ahnchan.bookstore Artifact : discovery Name : discovery Description : Demo project for Spring Boot Package name : com.ahnchan.bookstore.discovery Dependencies : Eureka Server
Details
Group : com.ahnchan.bookstore Artifact : details Name : details Description : Demo project for Spring Boot Package name : com.ahnchan.bookstore.details Dependencies : Eureka Discovery Client, Spring Web, Spring Data JPA, H2 Database, Lombok, OpenFeign
Reviews
Group : com.ahnchan.bookstore Artifact : reviews Name : reviews Description : Demo project for Spring Boot Package name : com.ahnchan.bookstore.reviews Dependencies : Eureka Discovery Client, Spring Web, Spring Data JPA, H2 Database, Lombok, OpenFeign
Discovery
discovery는 Eureka Server (Service Registration)을 구동하는 용도이다. 간단한 Annotation 추가로 서버를 구동할 수 있다.
@EnableEurekaServer 를 추가하여 EurekaServer를 Enable 시킨다. 파일 : DiscoveryApplication.java
1
2
3
4
5
6
7
8
9
@EnableEurekaServer
@SpringBootApplication
public class DiscoveryApplication {

   public static void main(String[] args) {
       SpringApplication.run(DiscoveryApplication.class, args);
   }

}
Eureka 서버의 설정을 추가한다. 파일 : application.properties
1
2
3
4
server.port=8761

eureka.client.register-with-eureka=false
eureka.client.fetch-registry=false
- eureka.client.server.port : Eureka Server의 Port는 8761로 설정한다.
- eureka.client.register-with-eureka : 서버만 수행할거라서 false로 설정한다.
- fetch-registry : server로 부터 정보를 주기적으로 받는 기능으로 서버로만 사용할 것이라 false로 설정한다.
Discovery Server 는 간단하게 구성이되며 명령문으로 구동을 확인한다.
Note. STS나 IntelliJ 에서 Run Application으로 구동을 하여도 된다.
1
2
3
4
5
6
7
8
9
10
11
12
13
14
15
16
17
18
19
$ mvn spring-boot:run
  .   ____          _            __ _ _
 /\\ / ___'_ __ _ _(_)_ __  __ _ \ \ \ \
( ( )\___ | '_ | '_| | '_ \/ _` | \ \ \ \
 \\/  ___)| |_)| | | | | || (_| |  ) ) ) )
  '  |____| .__|_| |_|_| |_\__, | / / / /
 =========|_|==============|___/=/_/_/_/
 :: Spring Boot ::                (v2.5.4)

2021-09-09 15:27:32.216  INFO 32984 --- [           main] c.a.b.discovery.DiscoveryApplication     : Starting DiscoveryApplication using Java 11.0.11 on 36-221-190-190.cab.prima.net.ar with PID 32984 (/Users/ahnchan/Workspaces/Projects/Tutorial/tutorial-spring-service-registration-and-discovery/bookstore/complete/discovery/target/classes started by ahnchan in /Users/ahnchan/Workspaces/Projects/Tutorial/tutorial-spring-service-registration-and-discovery/bookstore/complete/discovery)
2021-09-09 15:27:32.220  INFO 32984 --- [           main] c.a.b.discovery.DiscoveryApplication     : No active profile set, falling back to default profiles: default
2021-09-09 15:27:33.280  INFO 32984 --- [           main] o.s.cloud.context.scope.GenericScope     : BeanFactory id=b429867f-893f-3880-a8fd-fde460bda783
2021-09-09 15:27:33.581  INFO 32984 --- [           main] o.s.b.w.embedded.tomcat.TomcatWebServer  : Tomcat initialized with port(s): 8761 (http)
2021-09-09 15:27:33.593  INFO 32984 --- [           main]
...
e.s.EurekaServerInitializerConfiguration : Started Eureka Server
2021-09-09 15:27:35.902  INFO 32984 --- [           main] o.s.b.w.embedded.tomcat.TomcatWebServer  : Tomcat started on port(s): 8761 (http) with context path ''
2021-09-09 15:27:35.904  INFO 32984 --- [           main] .s.c.n.e.s.EurekaAutoServiceRegistration : Updating port to 8761
2021-09-09 15:27:35.923  INFO 32984 --- [           main] c.a.b.discovery.DiscoveryApplication     : Started DiscoveryApplication in 4.69 seconds (JVM running for 5.19)
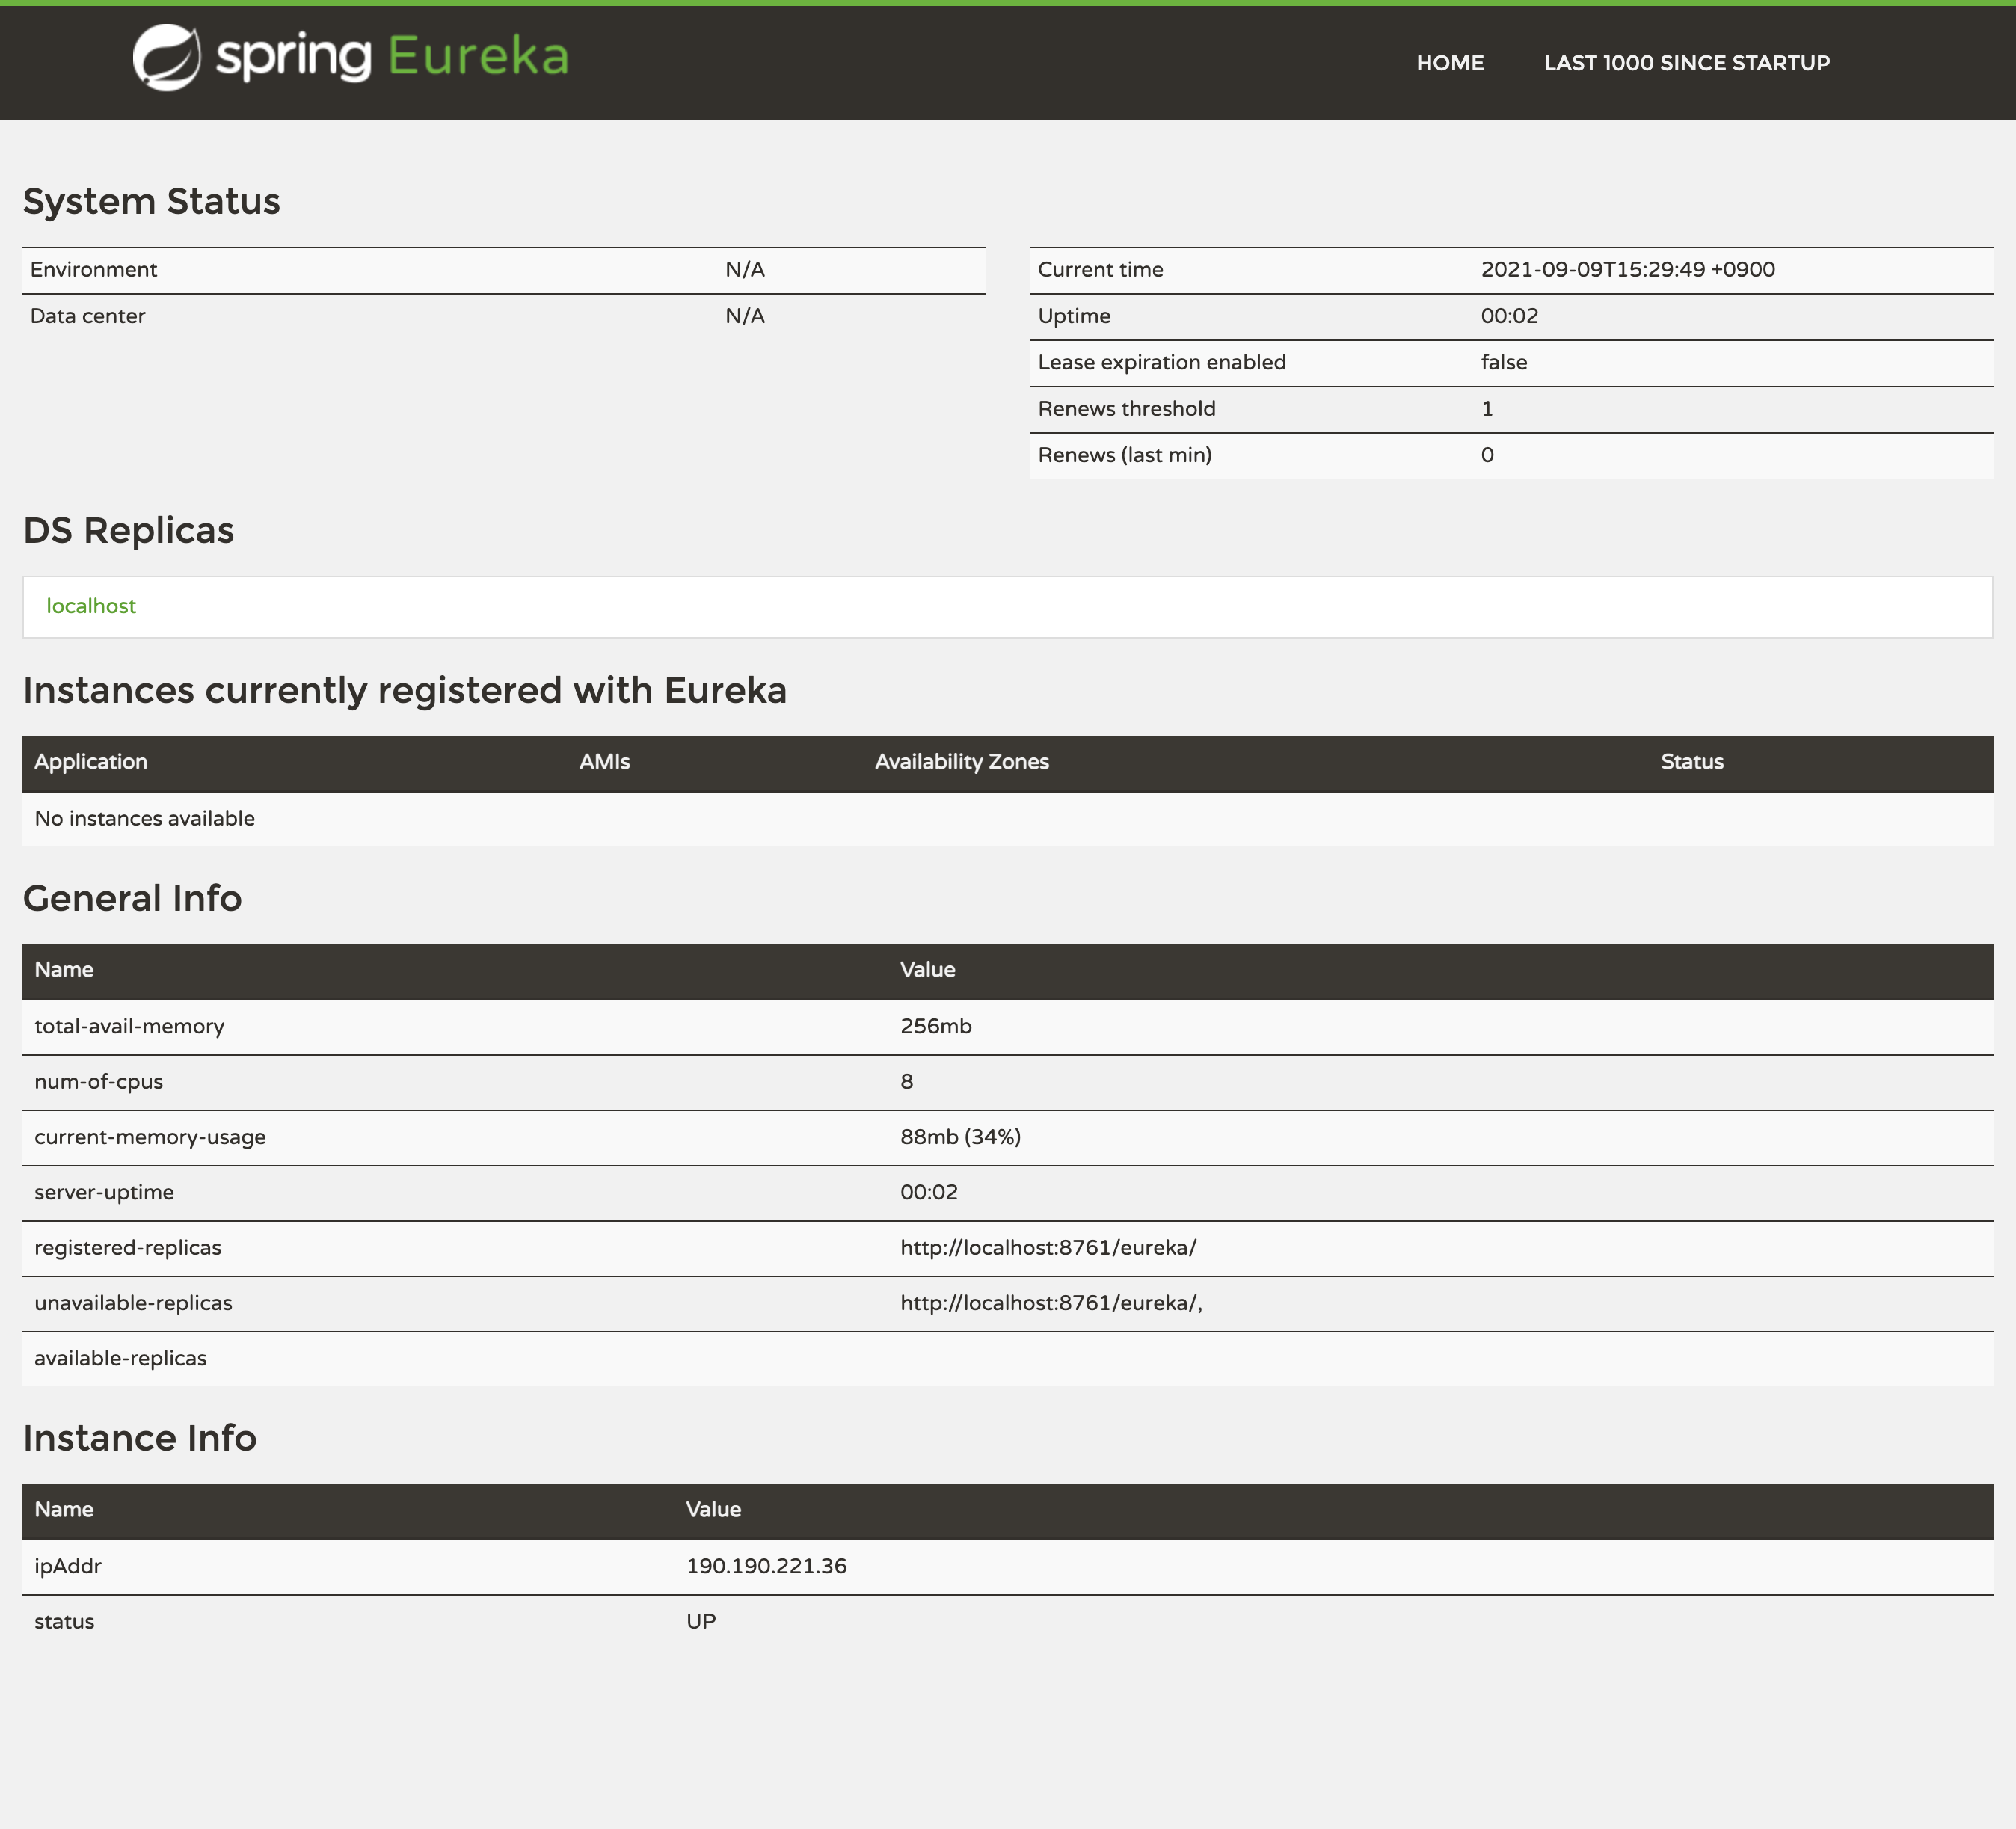
8761포트로 discovery server가 구동이 되었다는 것을 확인할 수 있다. 웹 브라우저에서 http://localhost:8761 를 입력하면 Eureka 서버의 구동을 확인할 수 있다.

Detail Service
책의 정보를 제공하는 API 서비스이다. Book(Product)의 정보만 제공하는 API와 review 정보(Review Service)도 같이 포함하여 제공하는 API도 있다. Review정보도 같이 제공하는 경우에는 Review service에 정보를 요청하여 가져온다. 이 부분이 실제로 서비스간의 정보 교환으로 Detail Service와 Review Service를 각각 구성한 후에 추가를 설명을 할 것이다.
Dependencies에 추가된 라이브러리 설명
- Eureka Discovery Client : discovery client로 구동시 Eureka Server에 서비스를 등록한다. 그정보를 이용하여 다른 서비스에서 API 호출할 수 있다.
- Spring Web : REST API를 구현하기 위한 Library이다.
- Spring Data JPA, H2 Database : H2 Database(Memory)를 사용하고 Java Persistence를 사용하기 위해 추가한 Library 이다.
- Lombok : Entit나 Model Class의 사용을 편하게 하는 라이브러리이다.
- OpenFeign : 등록된 서비스를 사용할때 편리하게 하는 라이브러리이다.
Discovery Client를 활성화 해보자 @EnableDiscoveryClient Annotation으로 간단하게 활성화할 수 있다. 파일 : DetailsApplcation.java
1
2
3
4
5
6
7
@EnableDiscoveryClient
@SpringBootApplication
public class DetailsApplication {
   public static void main(String[] args) {
       SpringApplication.run(DetailsApplication.class, args);
   }
}
이 튜토리얼에서는 @EnableDiscoveryClient를 사용하였다. Eureka 를 서버로 사용하기에 @EnableEurekaClient를 사용하여도 무방하다.
H2 데이터베이스의 설정을 해보자. Application이 시작하는 시점에 메모리에 Table을 생성하고, 기본 정보를 넣는다. 이를 위해 schema.sql, data.sql을 작성해보자. 이 파일들은 resource에 위치한다. 파일: schema.sql
1
2
3
4
5
6
create table product (
   id number primary key,
   title varchar(200) not null,
   author varchar(100),
   ISBN varchar(20)
);
파일: data.sql
1
2
3
4
5
6
7
8
9
10
11
12
13
14
15
16
17
18
19
20
21
22
23
24
insert into product(id, title, author, ISBN)
values( 1, 'The Keeper of Happy Endings',
      'Barbara Davis',
      '1542021472');

insert into product(id, title, author, ISBN)
values( 2, 'The Moonlight Child',
      'Karen McQuestion',
      '098641641X');

insert into product(id, title, author, ISBN)
values( 3, 'The Casanova (The Miles High Club Book 3)',
      'T L Swan',
      '1542028078');

insert into product(id, title, author, ISBN)
values( 4, 'American Marxism',
      'Mark R. Levin',
      '150113597X');

insert into product(id, title, author, ISBN)
values( 5, 'Verity',
      'Colleen Hoover',
      'B07HJYTRMD');
H2와 JPA의 설정을 추가해보자 파일 : application.properties
1
2
3
4
spring.application.name=details

spring.jpa.generate-ddl=false
spring.jpa.hibernate.ddl-auto=none
- spring.applcation.name : 해당 Application/Service의 이름으로 Eureka 서버에 등록되는 이름이 된다.
- spring.jpa.generate-ddl : Entity로 자동으로 Table이 생성되지 않게 false로 설정한다.
- spring.jpa.hibernate.ddl-auto : none으로 설정하여 초기 실행시 아무 것도 안하도록 한다.
데이터베이스 구성을 했으니 이제 Entity와 Repository를 추가해보자. main()이 있는 Application Class에 추가를 한다. 파일 : DiscoveryApplication.java
1
2
3
4
5
6
7
8
9
10
11
@Entity
@Data
@AllArgsConstructor
@NoArgsConstructor
class Product {
   @Id
   private Integer id;
   private String title;
   private String author;
   private String ISBN;
}
Product Class가 Entity인 것을 표시(@Entity)하고, Lombok의 @Data를 이용하여 Getter/Setter가 자동으로 Generation 되도록 한다. @AllAgsContructor는 모든 속성을 Parameter로 한 Constructor를 생성하는 기능이다. @NoArgsConstructor는 Parameter들 없이 Constructor를 생성하는 기능이다.
CrudRepository를 상속받은 Repository를 생성한다. Like검색을 해보기 위해 사용해봤다. JpaRepository를 사용해도 상관없을 것 같다.
1
2
3
4
5
interface ProductRepository extends CrudRepository<Product, Integer> {
   List<Product> findAll();
   List<Product> findByTitleLike(String title);
   Optional<Product> findById(Integer id);
}
이제 API 서비스를 위한 Controller를 추가하고 API를 만들어보다.
1
2
3
4
5
6
7
8
9
10
11
12
13
14
15
16
17
18
19
20
21
@RestController
class DetailsController {

   @Autowired
   private ProductRepository repository;

   @GetMapping("/products")
   public Collection<Product> getProduct() {
       return repository.findAll();
   }

   @GetMapping("/products/{id}")
   public Optional<Product> getProductDetail(@PathVariable Integer id) {
       return repository.findById(id);
   }

   @GetMapping("/products/title/{title}")
   public Collection<Product> getProductByTitle(@PathVariable String title) {
       return repository.findByTitleLike("%"+title+"%");
   }
}
DetailsController Class를 만들고 @RestController로 선언을 한다. 이제 API를 추가해보자.
- /products : 모든 product 들의 정보를 보낸다.
- /product/{id} : 특정 {id}인 product 정보를 보낸다.
- /products/title/{title} : {title} 텍스트가 들어간 product 들을 전달한다.
여기까지 작성였으면 Application을 시작 해보다.
1
2
3
4
5
6
7
8
9
10
11
12
13
14
15
16
17
18
19
20
21
22
$ mvn spring-boot:run
  .   ____          _            __ _ _
 /\\ / ___'_ __ _ _(_)_ __  __ _ \ \ \ \
( ( )\___ | '_ | '_| | '_ \/ _` | \ \ \ \
 \\/  ___)| |_)| | | | | || (_| |  ) ) ) )
  '  |____| .__|_| |_|_| |_\__, | / / / /
 =========|_|==============|___/=/_/_/_/
 :: Spring Boot ::                (v2.5.4)

2021-09-09 16:15:52.405  INFO 33862 --- [           main] c.a.b.details.DetailsApplication         : Starting DetailsApplication using Java 11.0.11 on 36-221-190-190.cab.prima.net.ar with PID 33862 (/Users/ahnchan/Workspaces/Projects/Tutorial/tutorial-spring-service-registration-and-discovery/bookstore/complete/details/target/classes started by ahnchan in /Users/ahnchan/Workspaces/Projects/Tutorial/tutorial-spring-service-registration-and-discovery/bookstore/complete/details)
2021-09-09 16:15:52.406  INFO 33862 --- [           main] c.a.b.details.DetailsApplication         : No active profile set, falling back to default profiles: default
2021-09-09 16:15:53.198  INFO 33862 --- [           main] .s.d.r.c.RepositoryConfigurationDelegate : Bootstrapping Spring Data JPA repositories in DEFAULT mode.
2021-09-09 16:15:53.270  INFO 33862 --- [           main] .s.d.r.c.RepositoryConfigurationDelegate : Finished Spring Data repository scanning in 61 ms. Found 1 JPA repository interfaces.
2021-09-09 16:15:53.503  INFO 33862 --- [           main] o.s.cloud.context.scope.GenericScope     : BeanFactory id=db272ae3-69fd-322d-8a19-a36576b679af
2021-09-09 16:15:53.886  INFO 33862 --- [           main] o.s.b.w.embedded.tomcat.TomcatWebServer  : Tomcat initialized with port(s): 8080 (http)
2021-09-09 16:15:53.899  INFO 33862 --- [           main]
...
2021-09-09 16:15:57.079  INFO 33862 --- [nfoReplicator-0] com.netflix.discovery.DiscoveryClient    : DiscoveryClient_DETAILS/36-221-190-190.cab.prima.net.ar:details: registering service...
2021-09-09 16:15:57.110  INFO 33862 --- [           main] o.s.b.w.embedded.tomcat.TomcatWebServer  : Tomcat started on port(s): 8080 (http) with context path ''
2021-09-09 16:15:57.111  INFO 33862 --- [           main] .s.c.n.e.s.EurekaAutoServiceRegistration : Updating port to 8080
2021-09-09 16:15:57.125  INFO 33862 --- [           main] c.a.b.details.DetailsApplication         : Started DetailsApplication in 5.243 seconds (JVM running for 5.699)
2021-09-09 16:15:57.235  INFO 33862 --- [nfoReplicator-0] com.netflix.discovery.DiscoveryClient    : DiscoveryClient_DETAILS/36-221-190-190.cab.prima.net.ar:details - registration status: 204
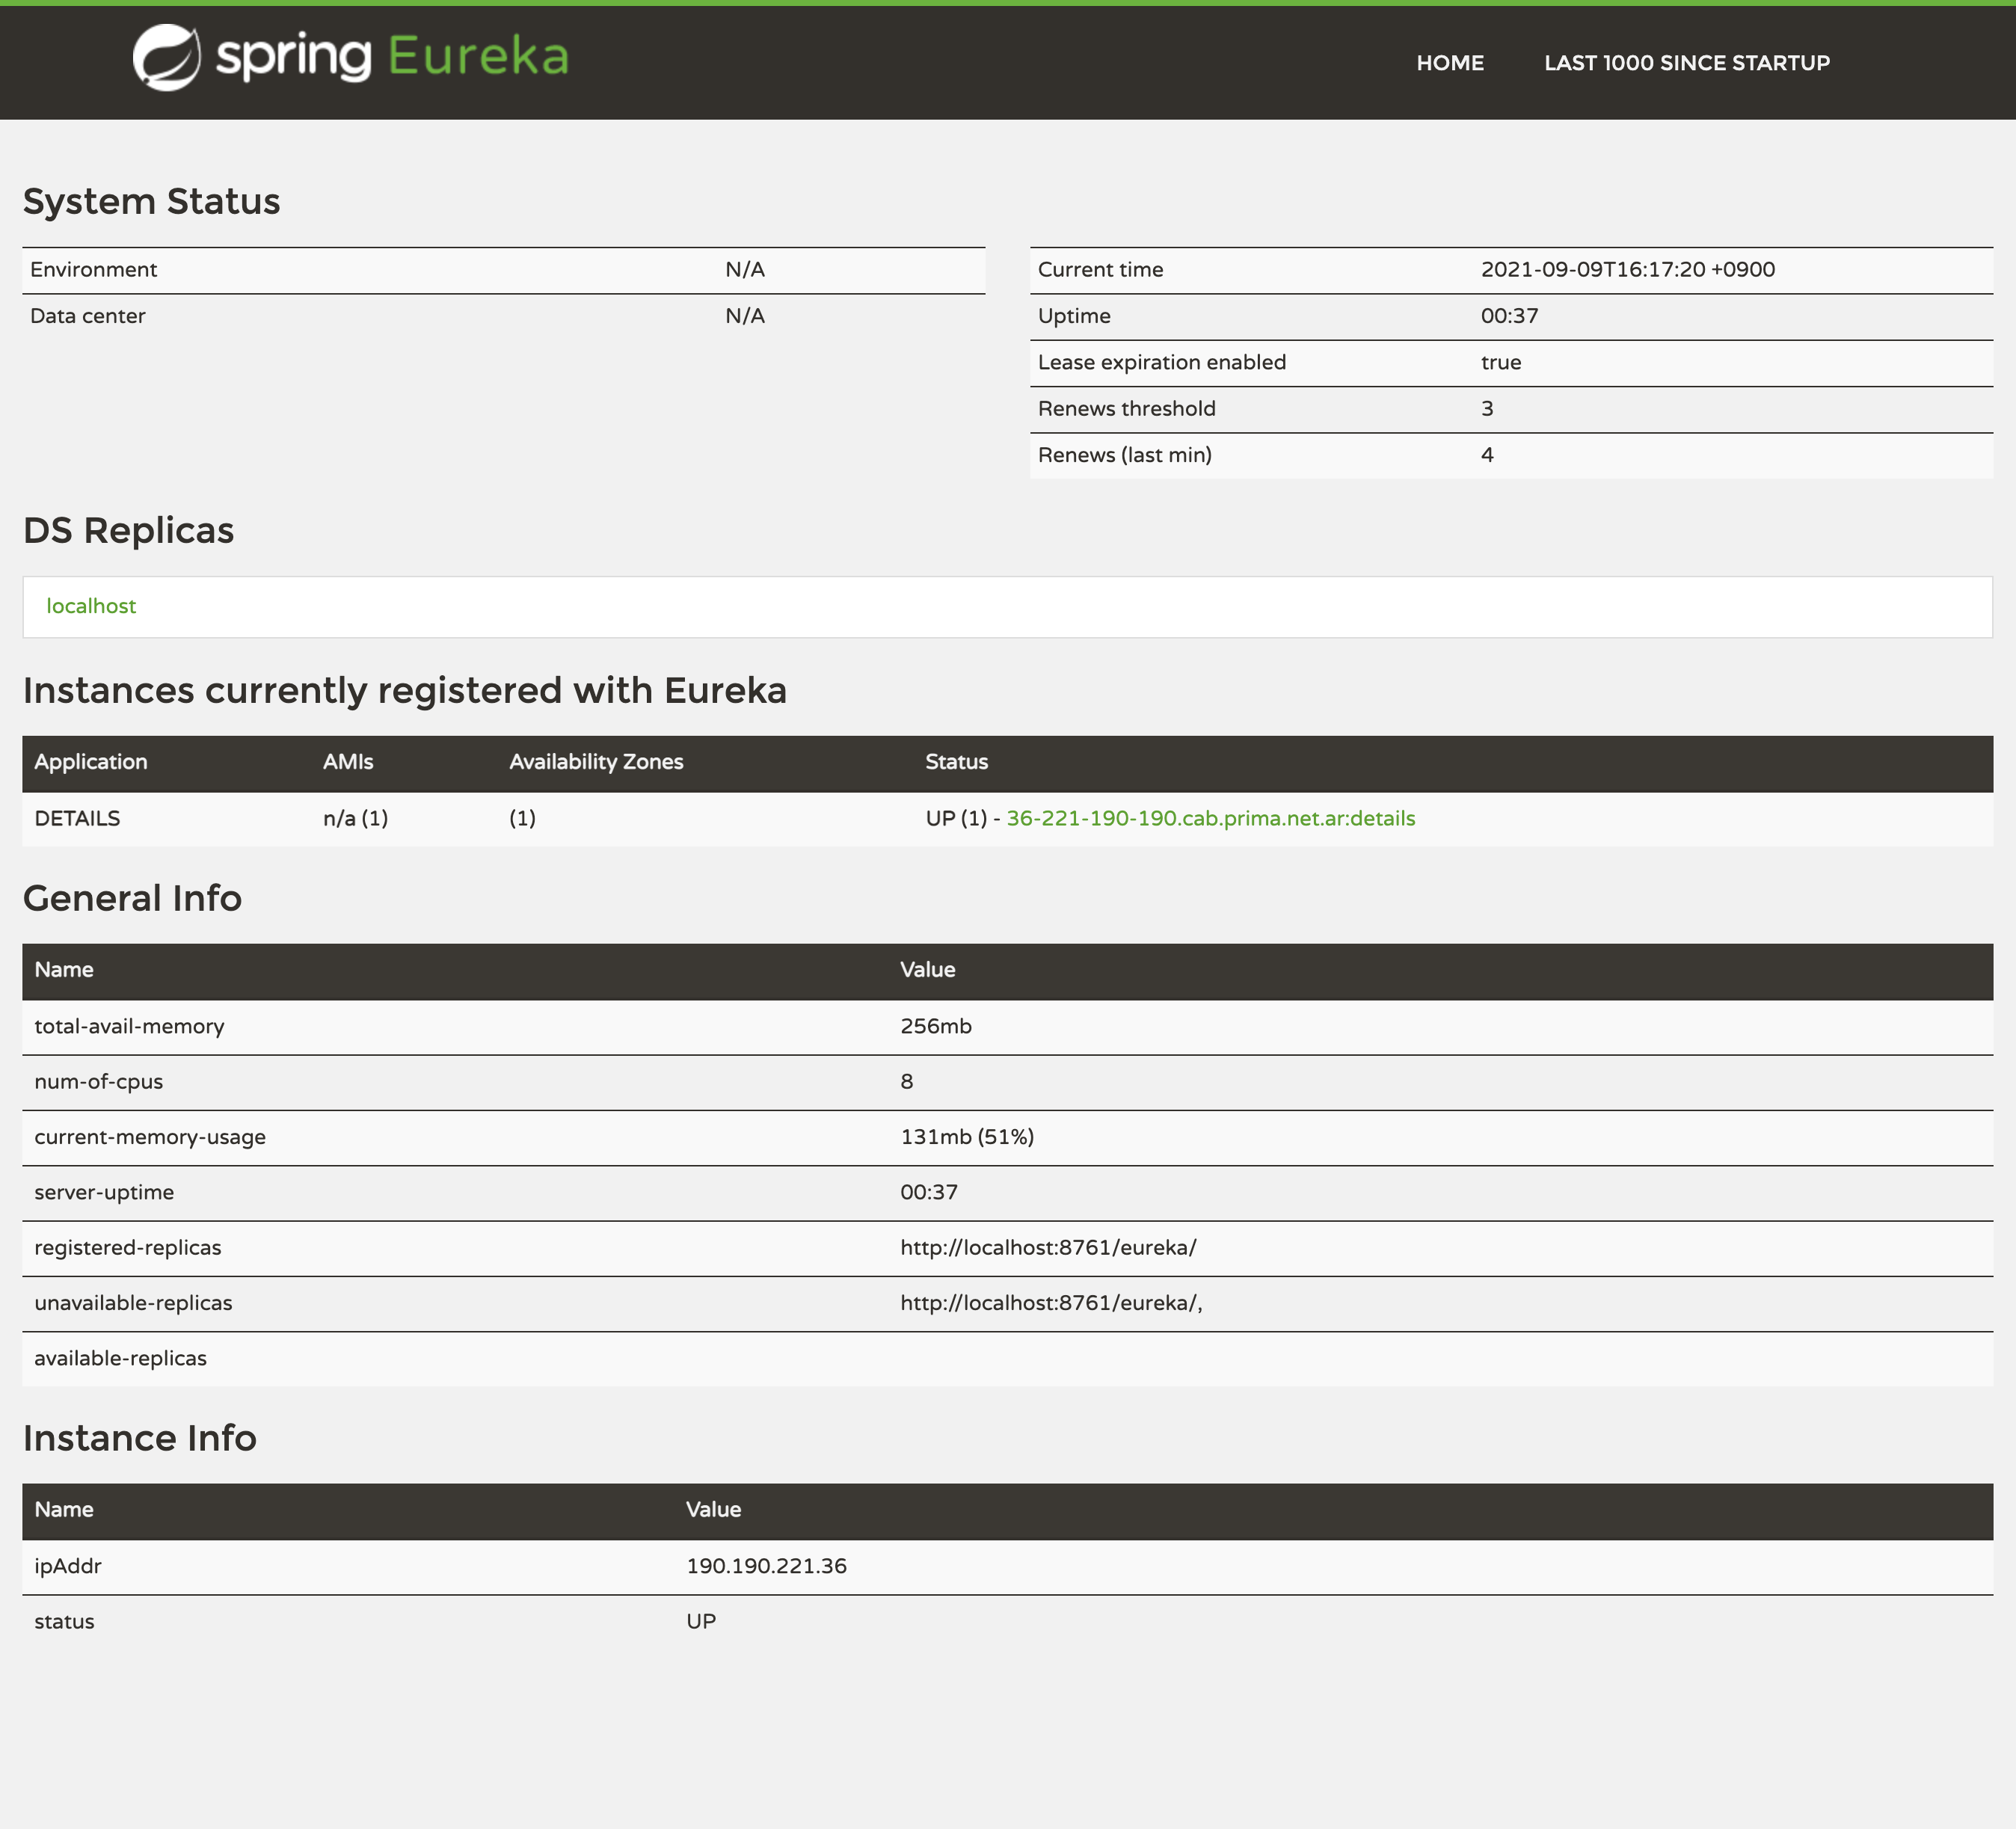
8080으로 서비스가 시작된 것을 확인할 수 있다. Eureka Server에서도 접속하여 확인을 해 본다.

API를 호출하여 서비스가 정상동작하는 것을 확인한다.
Note. jq는 JSON 형태의 Response를 보기좋게 해주는 Tools이다. (https://stedolan.github.io/jq/)
1
2
3
4
5
6
7
8
9
10
11
12
13
14
15
16
$ curl localhost:8080/products | jq
[
  {
    "id": 1,
    "title": "The Keeper of Happy Endings",
    "author": "Barbara Davis",
    "isbn": "1542021472"
  },
...
  {
    "id": 5,
    "title": "Verity",
    "author": "Colleen Hoover",
    "isbn": "B07HJYTRMD"
  }
]
Database와 API 서비스가 동작하는 것을 확인하였다. 이제는 Review Service를 만들고 서비스 연결을 위해 추가로 코딩을 해보겠다.
Review Service
책(Product)에 대한 Review 제공한다. 기본적인 라이브러리 구성은 Detail Service와 동일하다.
파일 : ReviewsApplication.java
1
2
3
4
5
6
7
8
9
@EnableDiscoveryClient
@SpringBootApplication
public class ReviewsApplication {

   public static void main(String[] args) {
       SpringApplication.run(ReviewsApplication.class, args);
   }

}
@EnableDiscoveryClient를 추가하여 Discovery Client를 활성화 한다.
Review를 위한 테이블과 초기 데이터를 설정한다. 파일 : schema.sql
1
2
3
4
5
6
create table review (
   id serial primary key,
   id_product int not null,
   reviewer varchar(100),
   text varchar(255)
);
파일 : data.sql
1
2
3
4
5
6
7
8
9
10
11
12
13
14
15
16
17
18
19
20
21
22
23
24
insert into review (id_product, reviewer, text)
values (1,
       'linda galella',
       'we just don''t like each other very much.\”');

insert into review (id_product, reviewer, text)
values( 1,
       'Klapaucjusz',
       'It is one more book about WW II where action takes place in different time frames.');

insert into review (id_product, reviewer, text)
values( 2,
       'teachlz',
       'Linda’s Book Obsession Reviews “THE MOONLIGHT CHILD” by Karen McQuestion, NightSky Press, September 2020');

insert into review (id_product, reviewer, text)
values( 2,
       'Lee W. Slice',
       'The glowing 5-star reviews convinced me to order this book, and now that I''ve read it I seriously wonder if those reviews are legit.');

insert into review (id_product, reviewer, text)
values( 1,
       'DisneyDenizen',
       'ON THE PLUS SIDE: Written by an established author.');
설정값을 넣는다. 파일 : application.properties
1
2
3
4
5
spring.application.name=reviews
server.port=8081

spring.jpa.generate-ddl=false
spring.jpa.hibernate.ddl-auto=none
Review의 Entity를 구성한다.
1
2
3
4
5
6
7
8
9
10
11
@Entity
@Data
@AllArgsConstructor
@NoArgsConstructor
class Review {
   @Id
   private Integer id;
   private Integer id_product;
   private String reviewer;
   private String text;
}
Repository를 구성한다.
1
2
3
4
interface ReviewRepository extends JpaRepository<Review, Integer> {
   @Query("select r from Review r where r.id_product = :id_product")
   List<Review> retrivefindById_product(@Param("id_product") Integer id_product);
}
API를 추가한다.
1
2
3
4
5
6
7
8
9
10
11
12
13
14
15
16
@RestController
class ReviewController {

   @Autowired
   private ReviewRepository repository;

   @GetMapping("/products/reviews")
   public List<Review> getReviews() {
       return repository.findAll();
   }

   @GetMapping("/products/{id}/reviews")
   public List<Review> getReviewsByProductId(@PathVariable Integer id) {
       return repository.retrivefindById_product(id);
   }
}
- products/reviews : 모든 Review를 확인한다.
- products/{id}/reviews : Product의 id를 확인하여 해당 Review를 확인한다.
소스 추가가 완료되었으면, Application을 실행해 본다.
1
2
3
4
5
6
7
8
9
10
11
12
13
14
15
16
17
$ mvn spring-boot:run
  .   ____          _            __ _ _
 /\\ / ___'_ __ _ _(_)_ __  __ _ \ \ \ \
( ( )\___ | '_ | '_| | '_ \/ _` | \ \ \ \
 \\/  ___)| |_)| | | | | || (_| |  ) ) ) )
  '  |____| .__|_| |_|_| |_\__, | / / / /
 =========|_|==============|___/=/_/_/_/
 :: Spring Boot ::                (v2.5.4)

2021-09-09 16:28:01.004  INFO 36116 --- [           main] c.a.b.reviews.ReviewsApplication         : Starting ReviewsApplication using Java 11.0.11 on 36-221-190-190.cab.prima.net.ar with PID 36116 (/Users/ahnchan/Workspaces/Projects/Tutorial/tutorial-spring-service-registration-and-discovery/bookstore/complete/reviews/target/classes started by ahnchan in /Users/ahnchan/Workspaces/Projects/Tutorial/tutorial-spring-service-registration-and-discovery/bookstore/complete/reviews)
2021-09-09 16:28:01.006  INFO 36116 --- [           main] c.a.b.reviews.ReviewsApplication         : No active profile set, falling back to default profiles: default
2021-09-09 16:28:01.684  INFO 36116 --- [           main] .s.d.r.c.RepositoryConfigurationDelegate : Bootstrapping Spring Data JPA repositories in DEFAULT mode.
...
2021-09-09 16:28:05.286  INFO 36116 --- [           main] o.s.b.w.embedded.tomcat.TomcatWebServer  : Tomcat started on port(s): 8081 (http) with context path ''
2021-09-09 16:28:05.287  INFO 36116 --- [           main] .s.c.n.e.s.EurekaAutoServiceRegistration : Updating port to 8081
2021-09-09 16:28:05.302  INFO 36116 --- [           main] c.a.b.reviews.ReviewsApplication         : Started ReviewsApplication in 4.797 seconds (JVM running for 5.245)
2021-09-09 16:28:05.309  INFO 36116 --- [nfoReplicator-0] com.netflix.discovery.DiscoveryClient    : DiscoveryClient_REVIEWS/36-221-190-190.cab.prima.net.ar:reviews:8081 - registration status: 204
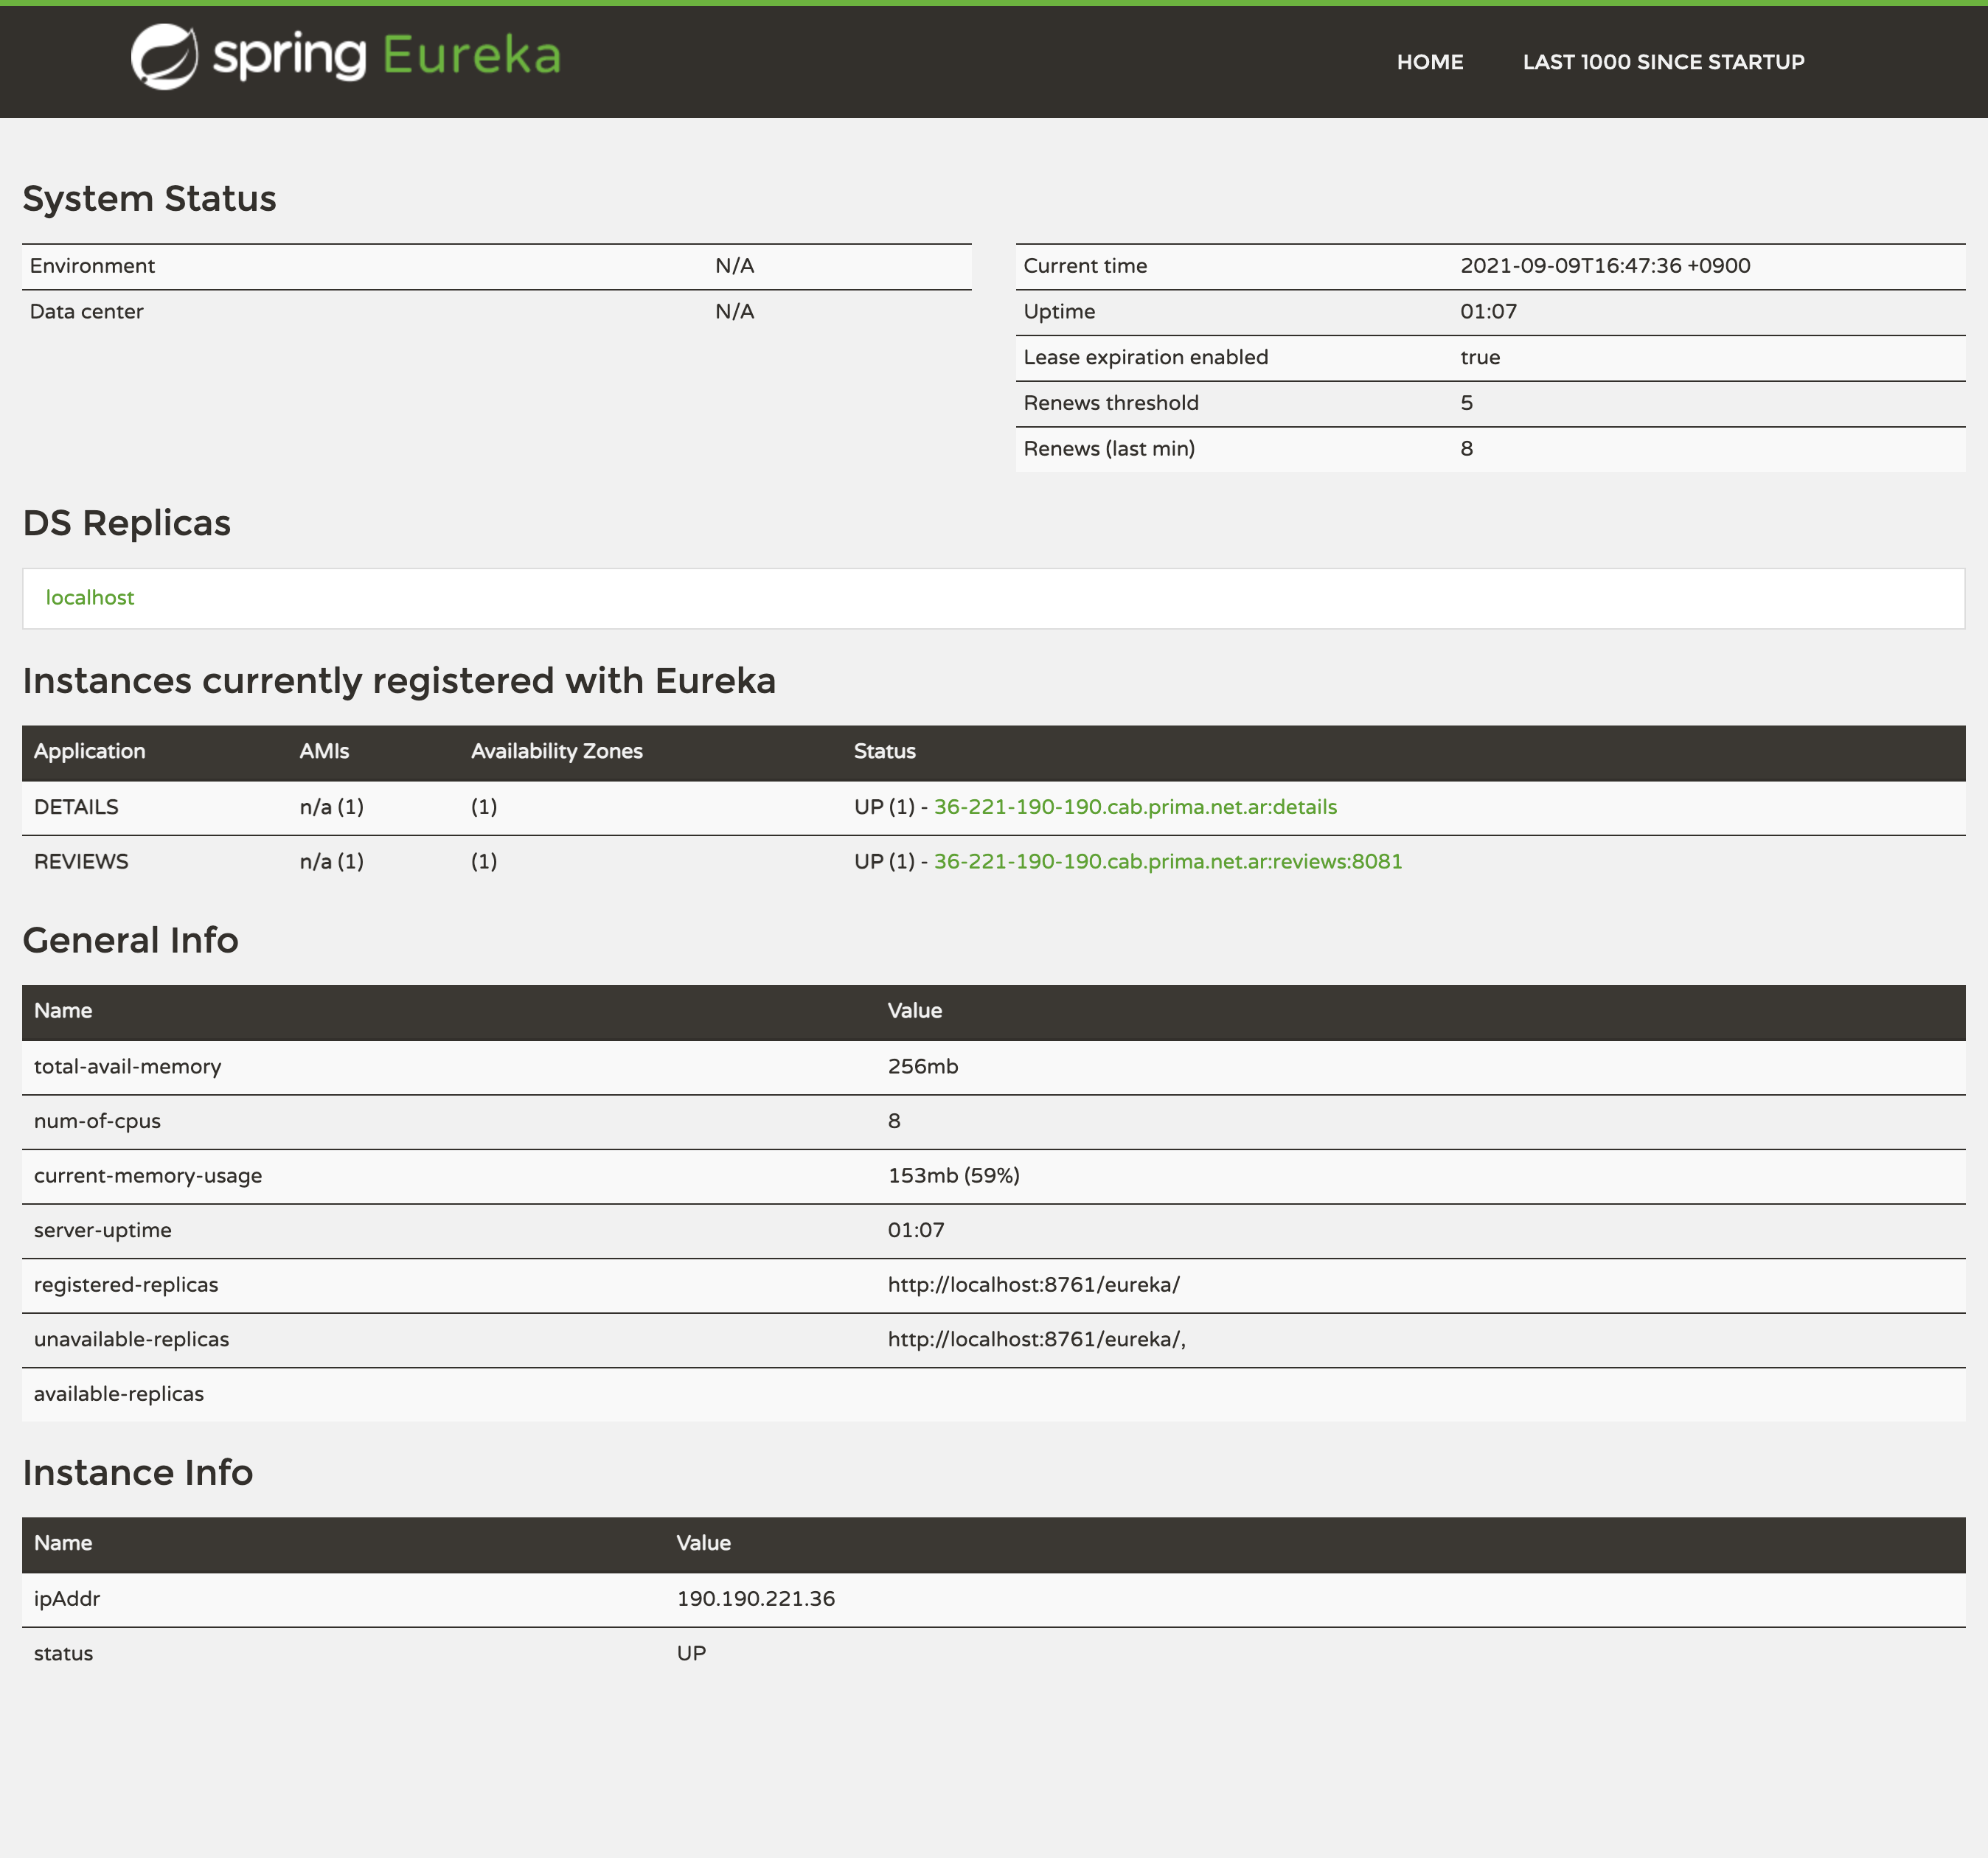
서비스 포트는 application.properties에 정의한 8081로 시작된 것을 확인 할 수 있다. Eureka Server에서도 REVIEWS가 등록된 것을 확인 할 수 있다.

API를 호출하여 동작이 잘되는지 확인을 한다.
1
2
3
4
5
6
7
8
9
10
11
12
13
14
15
16
17
18
19
20
21
$ curl localhost:8081/products/1/reviews | jq
[
  {
    "id": 1,
    "id_product": 1,
    "reviewer": "linda galella",
    "text": "we just don't like each other very much.\\”"
  },
  {
    "id": 2,
    "id_product": 1,
    "reviewer": "Klapaucjusz",
    "text": "It is one more book about WW II where action takes place in different time frames."
  },
  {
    "id": 5,
    "id_product": 1,
    "reviewer": "DisneyDenizen",
    "text": "ON THE PLUS SIDE: Written by an established author."
  }
]
/products/1/reviews는 id가 1인 Product의 review정보를 제공한다. 이 API 를 Detail Service에서 호출할 것이다. 위와 같이 나왔으면 서비스가 정상적으로 동작하는 것이다.
Detail 에서 Review 정보를 호출하자.
이제는 Details 서비스에서 product 정보와 review 정보를 한꺼번에 가져오도록 해보자. 이를 위해서는 detail 서비스에서 review 서비스로 API를 호출해야한다.
@EnableFeignClient로 OpenFeign을 활성화 한다. 파일 : DetailApplication.java
1
2
3
4
5
6
7
8
@EnableDiscoveryClient
@EnableFeignClients
@SpringBootApplication
public class DetailsApplication {
   public static void main(String[] args) {
       SpringApplication.run(DetailsApplication.class, args);
   }
}
Review 서비스 호출을 위한 interface를 작성한다. 호출한 API (value=”products/{id_product}/reviews”)를 지정한다.
1
2
3
4
5
@FeignClient("REVIEWS")
interface ReviewClient {
   @RequestMapping(method = RequestMethod.GET, value="/products/{id_product}/reviews")
   List<Review> getReviews(@PathVariable Integer id_product);
}
API의 Response를 받을 Model들을 정의 한다.
1
2
3
4
5
6
7
@Data
class Review {
   private Integer id;
   private Integer id_product;
   private String reviewer;
   private String text;
}
Detail 서비스에도 API를 추가해보자. /products/{id}/detailV2 로 id를 받으면 product의 모든 정보 (기본정보 + Review)를 보낸다. (/products/{id}/detailV1 은 OpenFeign이 아닌 RestTemlate으로 구성해보려고 남겨놨다.)
1
2
3
4
5
6
7
8
9
10
11
12
13
14
15
16
17
@RestController
class DetailsController {

   ...

   // Use Spring OpenFeign
   @Autowired
   private ReviewClient reviewClient;

   @GetMapping("/products/{id}/detailsV2")
   public ProductDetail getProductDetailsV2(@PathVariable Integer id) {
       ProductDetail details = new ProductDetail();
       details.setProduct(repository.findById(id).get());
       details.setReviews(reviewClient.getReviews(id));
       return details;
   }
}
Product 전체 정보를 보낼 Model을 정의 한다.
1
2
3
4
5
@Data
class ProductDetail {
   private Product product;
   private Collection<Review> reviews;
}
이제 다시 detail Service를 시작해보자. 기존에 구동이 되고 있었으면 ctrl+z 로 Application의 구동을 종료하고 실행을 해야한다.
1
2
3
4
5
6
7
8
9
10
11
12
13
14
15
16
17
18
19
20
21
22
23
24
25
26
27
28
29
30
31
32
$ mvn spring-boot:run
…

$ curl localhost:8080/products/1/detailsV2 | jq
{
  "product": {
    "id": 1,
    "title": "The Keeper of Happy Endings",
    "author": "Barbara Davis",
    "isbn": "1542021472"
  },
  "reviews": [
    {
      "id": 1,
      "id_product": 1,
      "reviewer": "linda galella",
      "text": "we just don't like each other very much.\\”"
    },
    {
      "id": 2,
      "id_product": 1,
      "reviewer": "Klapaucjusz",
      "text": "It is one more book about WW II where action takes place in different time frames."
    },
    {
      "id": 5,
      "id_product": 1,
      "reviewer": "DisneyDenizen",
      "text": "ON THE PLUS SIDE: Written by an established author."
    }
  ]
}
Product의 기본 정보와 Review들을 확인할 수 있다.
Conclusions
Netflix Eureka 를 이용하여 Service Discovery를 구현해보았다. 마이크로 서비스를 위해서는 서비스간의 통신이 필수적이다. 통신을 일일히 만들수도 있지만 API가 늘어나다보면 코딩량도 많아지게 된다. 이럴때 이런 서비스를 이용하면 조금더 쉽게 사용할 수 있을 것이다.
실제 서비스를 위해서는 인증부분도 필요하고, API서비스에 문제가 있을때 Default처리, 여러 Service를 관리하기 위한 Gateway 등이 있을 것이다. 이제 차근차근 하나씩 만들어가보자.
References
Spring Guides - Service Registration and Discovoery