created : 2021-10-18, updated : 2021-10-18
Introduction
Microservice구성에서 많은 API Service가 분산되어 있다. 그래서 좀더 효과적으로 사용하기 위해 Gateway를 사용한다. Gateway에서 공통으로 권한관리를 할수도 있고 서비스 관리를 할수도 있다. Nginx, 상용/공개 API Gateway등 다른 솔루션/제품을 사용할 수 있지만, Spring Framewrk내에서 Gateway를 구현해보도록 하겠다.
Requirements
“Service Registration and Discovery (Spring Boot)”
“Client Side Load Balancer - Ribbon (Spring Cloud)”
Note. 이 튜토리얼의 소스는 이곳에서 확인할 수 있다. initial은 이전 튜토리얼에서의 구성한 소스이고 complate는 본 튜토리얼에 추가한 부분이 포함되어 있다.
구성
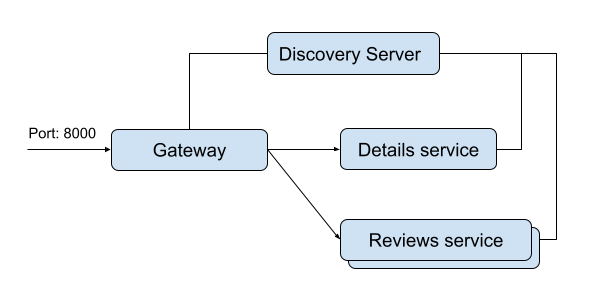
모든 API는 Gateway를 통과하도록 한다. 8000포트로 API를 요청하면 Path에 따라 각각의 Service를 호출하도록 한다.
Gateway 서버 구성을 위한 Library
Spring-cloud-starter-gateway : Spring Gateway를 사용하기 위함이다. Spring-cloud-starter-circuitbreaker-reactor-resilience4j : Circuit Breaker를 사용하기 위함이다. Spring-cloud-starter-netflix-eureka-client : Discovery Client를 사용하기 위함이다.
환경설정하기
Gateway를 구성을 위해 몇가지 환경설정을 추가한다. Server Port 는 중복되지 않게 8000으로 설정하고 모든 API를 이 Port로 요청하도록 한다. Eureka 서버에서 접속확인을 위해 Application 이름을 gateway로 설정을 한다. 그리고 Gateway에서 다른 Service로 호출시 Discovery Server의 정보를 이용하기 위해 spring.cloud.gateway.locator.enabled을 true로 설정을 한다.
파일 : application.properties
1
2
3
spring.application.name=gateway
server.port=8000
spring.cloud.gateway.discovery.locator.enabled=true
Application에 route를 설정해보자. 먼저 /products를 호출할때는 Eureka Server에 등록된 DETAILS를 호출하도록 한다.
파일: GatewayApplication.java
1
2
3
4
5
6
7
8
@Bean
RouteLocator gatewayRoute(RouteLocatorBuilder builder) {
	return builder.routes()
    .route(p -> p
      .path("/products/**")
      .uri("lb://details/products"))
  .build();
}
추가로 /reviews를 호출하면 REVIEWS를 호출하도록 한다. REVIEWS의 API Path는 Gateway에 구현을 하기 위해서 변경을 하였다. 이 API는 호출하는 곳이 *.ahnchan.com 인 곳에서만 처리되도록 설정을 추가하였다.
파일: GatewayApplication.java
1
2
3
4
5
6
7
...
  .route(p -> p
    .host("*.ahnchan.com")
    .and()
    .path("/reviews/**")
    .uri("lb://reviews/reviews"))
...
Circuit Breaker 추가해보자. filter에 CircuitBreaker를 추가하여 오류상황을 /fallback 으로 Forwarding 하도록 한다.
파일: GatewayApplication.java
1
2
3
4
5
6
7
8
9
...
  .route(p -> p
    .host("*.ahnchan.com")
    .filters(f -> f
      .circuitBreaker(config -> config
        .setName("fallback")
        .setFallbackUri("forward:/fallback")))
    .uri("lb://products"))
...
Circuit Breaker에서 설정한 /fallback을 구현해보자.
파일: GatewayApplication.java
1
2
3
4
5
6
7
@RestController
class GatewayRestController {
	@GetMapping("/fallback")
	public String fallback() {
		return "fallback";
	}
}
API 요청하기
먼저 /products를 호출해보자. DETAILS 서비스(https://localhost:8080/products)를 호출한 것과 같은 결과 값이 나온다.
1
2
3
4
5
6
7
8
9
10
11
12
13
14
15
16
17
18
19
20
21
22
23
24
25
26
27
28
29
30
31
32
33
$ curl http://localhost:8000/products | jq
[
  {
    "id": 1,
    "title": "The Keeper of Happy Endings",
    "author": "Barbara Davis",
    "isbn": "1542021472"
  },
  {
    "id": 2,
    "title": "The Moonlight Child",
    "author": "Karen McQuestion",
    "isbn": "098641641X"
  },
  {
    "id": 3,
    "title": "The Casanova (The Miles High Club Book 3)",
    "author": "T L Swan",
    "isbn": "1542028078"
  },
  {
    "id": 4,
    "title": "American Marxism",
    "author": "Mark R. Levin",
    "isbn": "150113597X"
  },
  {
    "id": 5,
    "title": "Verity",
    "author": "Colleen Hoover",
    "isbn": "B07HJYTRMD"
  }
]
이제는 /reviews를 호출해보자. 404 오류가 나온다. 위에서 ahnchan.com 도메인에서 호출을 해야되게 코딩을 했기 때문이다.
1
2
3
4
5
6
7
8
9
$ curl http://localhost:8000/reviews | jq
{
  "timestamp": "2021-10-19T02:46:25.482+00:00",
  "path": "/reviews",
  "status": 404,
  "error": "Not Found",
  "message": null,
  "requestId": "bc34ee6b-1"
}
Header에 host를 추가해서 호출해보자. 이제 결과값이 정확하게 나온다.
1
2
3
4
5
6
7
8
9
10
11
12
13
14
15
16
17
18
19
20
21
22
23
24
25
26
27
28
29
30
31
32
33
$ curl --header 'Host: www.ahnchan.com' http://localhost:8000/reviews | jq
[
  {
    "id": 1,
    "id_product": 1,
    "reviewer": "linda galella",
    "text": "we just don't like each other very much.\\""
  },
  {
    "id": 2,
    "id_product": 1,
    "reviewer": "Klapaucjusz",
    "text": "It is one more book about WW II where action takes place in different time frames."
  },
  {
    "id": 3,
    "id_product": 2,
    "reviewer": "teachlz",
    "text": "Linda's Book Obsession Reviews "THE MOONLIGHT CHILD" by Karen McQuestion, NightSky Press, September 2020"
  },
  {
    "id": 4,
    "id_product": 2,
    "reviewer": "Lee W. Slice",
    "text": "The glowing 5-star reviews convinced me to order this book, and now that I've read it I seriously wonder if those reviews are legit."
  },
  {
    "id": 5,
    "id_product": 1,
    "reviewer": "DisneyDenizen",
    "text": "ON THE PLUS SIDE: Written by an established author."
  }
]
오류로 호출해보자. forwad시 /fallback을 호출하게 했고 fallback에서 구현한 정보를 전달해주고 있다.
1
2
$ curl --header 'Host: www.ahnchan.com' http://localhost:8000/delay
fallback
Gateway를 yaml로 만들기
위에서 코딩한 route 정보는 yaml 파일로 똑같이 설정을 할 수 있다. 상황에 따라 사용하는 방법이 다를 수 있으니 참고하면 좋을 것 같다.
Note: yaml로 gateway를 구성하는 부분은 소스에서 /complete/gateway-yaml로 구현되어 있다.
기존의 환경설정 파일(application.properties)를 지우고 application.yaml 을 생성하자. yaml은 구조적으로 파악하기가 용이하여 많이 사용하는 추세이다.
기존에 설정한 application 이름, port를 추가해 보고 Java에서 코딩한 것과 동일하게 route를 설정하였다.
파일: application.yaml
1
2
3
4
5
6
7
8
9
10
11
12
13
14
15
16
17
18
19
20
21
22
23
24
25
26
27
28
29
30
31
32
server:
  port: 8000

spring:
  application:
    name: gateway

  cloud:
    gateway:
      routes:
        - id: details-service
          uri: lb://DETAILS/products
          predicates:
            - Path=/products/**
        - id: reviews-service
          uri: lb://REVIEWS/reviews
          predicates:
            - Path=/reviews/**
            - Host=*.ahnchan.com
        - id: circuitbreaker-route
          uri: lb://PRODUCTS
          predicates:
            - Host=*.ahnchan.com
          filters:
            - name: CircuitBreaker
              args:
                name: myCircuitBreaker
                fallbackUri: forward:/fallback

      discovery:
        locator:
          enabled: true
Note: reviews 서비스가 path와 동일하여 문제가 발생하였다. 그래서 이곳에서는 서비스를 호출할때 대문자로 명시하여 구분이 될수 있게 하였다.
Conclusions
Gateway는 외부에서 서비스로 호출할때 거치는 하나의 문지기이다. 이곳에 로그를 수집하거나, 권한을 관리하면 서비스에서는 자신의 비지니스 로직만 관리하면 되기 때문에 좀더 편하게 개발을 할 수 있을 것 이다.